
How to make a revolutionary medallion using 3D printing
A 3D printer makes a three-dimensional object from a computer aided design (CAD).
There are 3 steps:
- Design: using simple CAD software such as Tinkercad or Thingiverse
- Slice: a slicer program takes your CAD and turns it into files that can be read by your 3D printer. These usually come with the printer or can be found online e.g. https://ultimaker.com/software/ultimaker-cura or https://slic3r.org/
- Print: 3D printers can work with a range of materials, building the object up layer by layer. Some can print with metals and even chocolate! Most schools use plastic – this project used PLA, a robust, flexible plastic which can be printed at a low temperature. It is derived from crops such as corn and sugarcane, so has the added advantage of being biodegradable.
The National Museum of Computing (TNMoC)worked with the Milton Keynes Virtual School to design and create 3D printed medallions inspired by some of the many campaigns for political and social justice in the Age of Revolution.
They bought their printer from Prusa as a kit. However, there are many affordable models on the market.
If you can’t afford your own printer, try partnering with another school (eg as a transition project between a primary and secondary) or local organisation such as your local library, museum, fablab or maker club. Or get them printed by Tinkercad or one of many other organisations offering a print and deliver service.
Making your medallion
1. Inspiration
Explore some of the objects used in the Age of Revolution to campaign for equality and reform such as:
- Anti-slavery sugar bowl
- Drawer handle with Wedgwood abolitionist plaque
- Description of a slave ship
- Banner from the Peterloo massacre
- The Jeremiah Brandreth pot
- Luddite ticket
- Skelmanthorpe flag
- Chartist poster
Discuss the slogans and the campaigns behind them.
(Teachers may find our Introduction to the Age of Revolution and Enquiries exploring campaigns and protests useful).
Talk about the Printing revolution in the Age of Revolution and the links with the revolution in 3D printing today:
Advances in technology meant printed materials like pamphlets, posters and newspapers could be mass-produced much more quickly and cheaply than ever before, spreading ideas and messages across the country and even overseas at an unstoppable rate. Today, 3D printing means all manner of items – from bespoke prosthetic limbs to spare parts for cars – can be prototyped, adapted, shared and produced quickly and cheaply almost anywhere in the world.
Compare Koenig and Bauer’s steam powered printing press with the 3D printers of today.
2. Designing your medallion
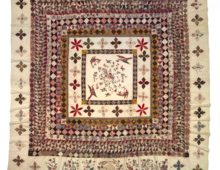
The Virtual School students designed and printed medallions inspired by the Wedgewood anti-slavery medallion. Creating a simple shape like this is a good place to start if students (and teachers!) are new to 3D printing. More experienced students could make more ambitious objects – perhaps inspired by household items like the sugar bowl.
Students create their design and slogan on paper first – this could be linked to a campaign from the Age of Revolution, or to a modern-day issue such as climate change, equal pay or animal rights.
They then create their CAD (Computer Aided Design). Websites such as Tinkercad and Thingiverse are great for creating CADs. They include:
- A gallery of ready-made 3D model projects for students to use
- Educator and student profiles, allowing teachers to manage students’ designs
- Tutorials and activity guides.
Use the tutorials, one of the existing ‘tinker’ designs or try this step-by-step guide to using Tinkercad from The National Museum of Computing to make your item.
- Click on the Blue 3D design button and create a class, so each student has their own code. Students enter their code to begin.
- Students choose a flat shape like a circle or square and drag and drop it onto the work plane. This will be the base of the medallion. (There are many shapes such as stars and diamonds which have pointed or curved bases. Supports are needed to avoid messy ‘spaghetti-like’ strands being printed and are best avoided by beginners.)
- Adjust the thickness of the base by clicking on the white box in the centre. Either drag the white box or add a number no bigger than 5mm.
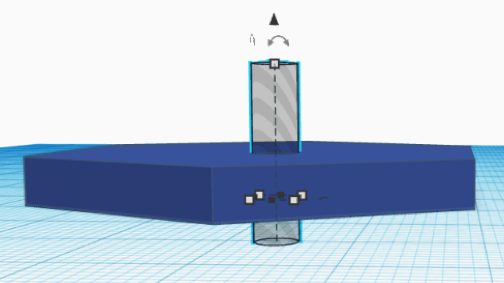
- Add a hole by dragging and dropping a cylinder (or another long, thin shape) through the base shape. Use the grey striped shape or you can use a 3D shape and turn it into a hole using the menu in the top right-hand corner (this appears when you click on the shape you want to edit). Resize the shape to make an appropriately sized hole.

- Drag and drop text onto the work plane. A dialogue window will come up which will allow students to make changes if they wish.
- Place text onto the base shape so that it is touching. Students should look at it from all angles to make sure the shapes are fully connected.
- Draw a box around all the parts. Click on the connect icon. Your base, hole and text have become one item.
- Save your file as an STL file.
3. Slicing and printing
- Make sure you have downloaded your slicer software. These usually come with the printer or can be found online e.g. https://ultimaker.com/software/ultimaker-cura https://slic3r.org/
- Drag and drop your CAD STL file into your slicer program.
- Load your printer with your chosen material (the Museum used PLA) and send your 3D file for printing (some printers use SD cards, others use a USB device or networked directly).
- PRINT.
4. More objects
Lots of museums and galleries are now making models of their collections freely available for 3D printing such as: