
How to make an interactive revolutionary banner using micro:bits and simple coding
A step-by-step guide to making your own felt, and mixing it with micro-bits and simple coding to create modern-day revolutionary banners
This activity is suitable for Ages 8 – 16+
This step-by-step guide shows how to create a felt banner from scratch, print a slogan and then add interactive elements using micro:bits and simple coding. It was inspired by the wool mills and textile producers of the Age of Revolution, along with campaigns for social justice and political reform.
The activity was developed by Leeds Museums & Galleries working with Year 5&6 students from Green Lane Primary School. See how they created their interactive banners here.
Micro:bits are simple to use and do not require any previous coding experience.
If you don’t already have micro:bits in school, Leeds Museums recommends Pimoroni as a good, school-friendly supplier (other suppliers are available).
Protest banners have a long history in communicating revolutionary messages, and helping people understand what is being campaigned for. Creating a revolutionary banner is a great way for students to explore the history of revolutions, the impact of different revolutions on their lives now, and what revolutionary changes they feel strongly about, and want to campaign for.
1. Inspiration
Teachers can use our Introducing the Age of Revolution guide to introduce the concept of revolution and campaigns.
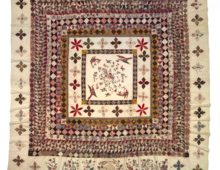
Images of objects such as the Peterloo banner, the Skelmanthorpe flag and other, more recent campaign banners covering a diverse range of themes are useful to provide inspiration. Lots of banners can also be seen in our FREE Peterloo graphic novel. Campaign themes could include women’s rights, poverty, homelessness, climate change, peace etc.
If relevant, students could visit their local Museum, like the students from Green Lane Primary School.
Focus on the use of colour, design and words or slogans chosen on the historical and more contemporary banners – banners should be easy to read with only a few words to quickly and clearly convey a message.
2. Generating ideas and planning the banners
In pairs or small groups, ask the students to talk about things in their lives or communities they would like to change. Then feedback as a whole class and make a list of their ideas. Students can then choose a campaign that they feel strongly about and want to create a banner for.
Students then plan their banner by drawing out the design on paper. Consider:
• Colour(s) and design of the main banner and printed letters (dark ink on a dark background won’t show up very well)
• Length of words / slogan – they may need help to cut down their message to a manageable length
• Where the micro:bit (and neopixels if using) will go, and what they will be programmed to do. (The students don’t need to write the actual code for this now, just noting down what they want their code to do in plain English will help them when they come to code it).
3. Making the felt
Making felt from wool is surprisingly easy using the wet felting technique (alternatively, squares of different coloured felt can be bought in haberdashery shops and cut to shape, glued or sewn together to make the main banner).
Equipment needed:
• Merino wool tops (lots of suppliers on the internet)
• Enough bubble wrap to provide each student with two pieces slightly larger than their banner
• Squirty bottles with a weak water and washing up liquid mixture (one per small group is enough)
• Enough space to work in. As its name suggests, this is a wet process!
Download visual step by step instructions here.
Once made, the felt banners will need to dry. Squeeze out any excess water, stretch the banner back into shape and leave in a dry and preferably warm place overnight.
4. Printing the slogan
The students from Green Lane Primary School used a real 150 year old printing press to create the lettering for their banners, but this is unlikely to be an option in the classroom! Letter printing blocks and ink pads can be used effectively, or small, folding printing presses can be bought quite cheaply.
Students should do a trial run by printing onto paper to make sure all the letter blocks are the correct way round and to double-check the spelling and spacing. They could also try printing onto a scrap of fabric to check they are loading up enough ink and pressing down on their blocks bard enough for the words to show clearly.
5. Adding digital interactivity: Micro:bits, neopixels and coding
Micro:bits are simple to use and do not require any previous coding experience. If you haven’t used them before, there’s a quick tutorial here to get familiar with them. The micro:bit coding platform makes it easy to get started, and there are lots of free step by step tutorials that use the ‘drag and drop’ type of coding that is used in this project that can be worked through to build confidence.
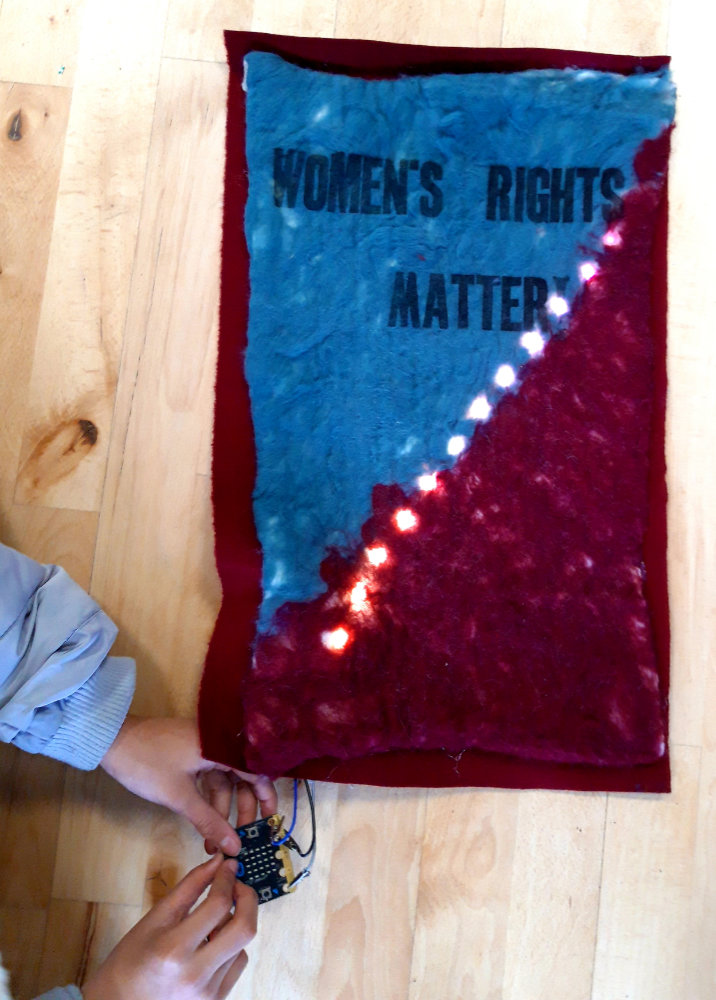
This project used a micro:bit and RGB neopixel strips (strips of red, green, blue programmable LEDs that are sold in metre lengths and easily cut to the required length). Each RGB neopixel is individually addressable, meaning each one can be set to any colour required and programmed to turn on and off as desired. This could allow for the use of colour to help communicate the banner’s message, for example, or flashing and sequencing lights to highlight particular areas of the banner.
Other neopixel options are available from suppliers, or the micro:bit could be used on its own, using the grid of 5 x 5 red LEDs on the front. This display allows for small images and graphs to be shown, and also for text to be scrolled across the face of the micro:bit.
To use neopixels with the micro:bit coding platform, the code snippets need to be added to the menu of code ready for use. This is very simple to do by clicking on the settings icon top right of the webpage (small cog symbol), and selecting ‘Extensions’ from the list. From the options that appear, select ‘neopixel’. The micro:bit coding platform will then refresh, and the neopixel blocks of code will appear in the menu on the left.
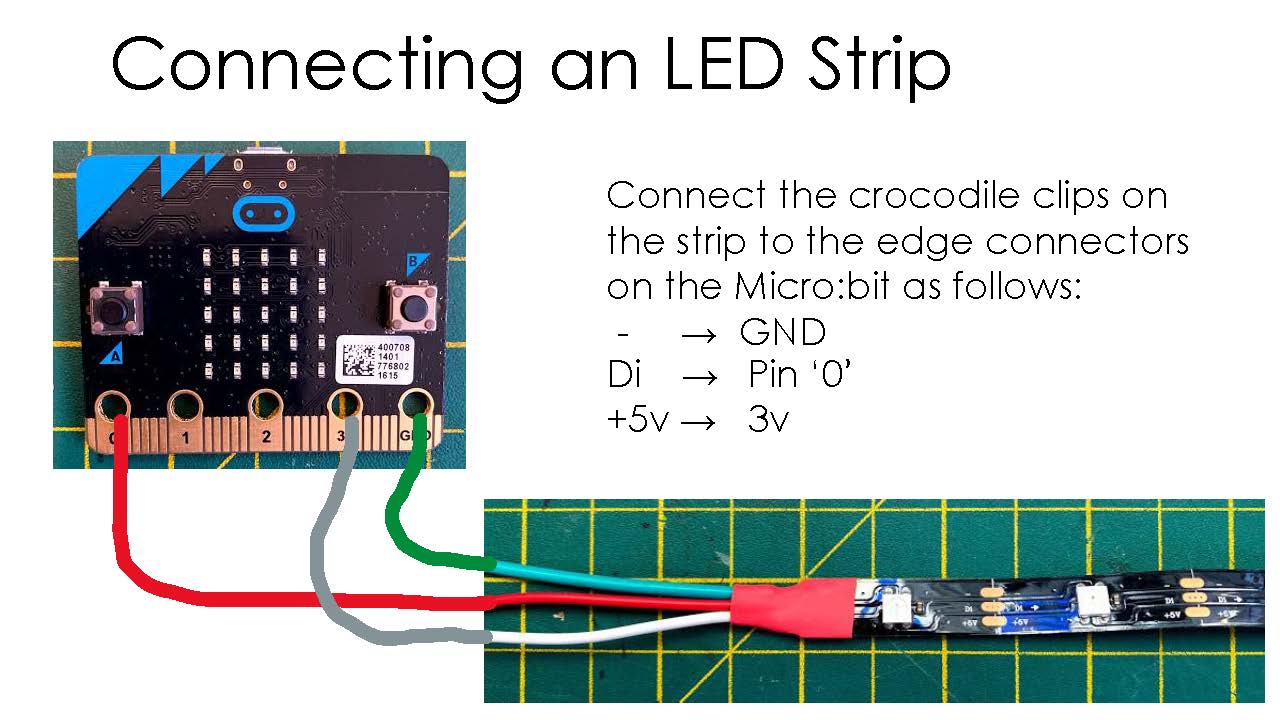
If using neopixel strips, it is recommended that strips are cut into lengths of about 8 – 10 neopixels as these can be powered effectively directly from the micro:bit. Crocodile clips can be added on to one end of the strip to make it easy to attach to the micro:bit. Step by step instructions on how to do this can be found here, and the diagram below shows how to connect the strip to the micro:bit.
Encourage students to code their micro:bit in a way that helps communicate their message. This could be by:
• choosing their colours carefully (this presents a good opportunity to talk about the different meanings of colours in different cultures)
• using the micro:bit display to show messages or animations, e.g. a call to action “What are you waiting for?” or “What will YOU change?”
For example, students could use the editable code here
Or embed the following code, which can be copied and pasted:
<div style="position:relative;height:calc(300px + 5em);width:100%;overflow:hidden;"><iframe style="position:absolute;top:0;left:0;width:100%;height:100%;" src="https://makecode.microbit.org/---codeembed#pub:_KPjRD19uvgve" allowfullscreen="allowfullscreen" frameborder="0" sandbox="allow-scripts allow-same-origin"></iframe></div>
Once the code is finalised, download it onto the micro:bit and assemble the banner. Micro:bits can be attached to the front or back of the banner depending on the design. They can easily be stitched on using the holes along the bottom (make sure to use normal thread, not conductive thread for this) or pockets can be made on the back of the banner to hold the micro:bit and battery.
Students could then organise a protest march through the school, to show off their banners and the revolutionary cause they want to campaign for. They could create an exhibition of the banners to allow other students to interact with them, using the micro:bits.